I try a lot of models daily, and I kept ending up with a separate API key for every model provider I wanted to test with my desired harness. So I decided to try Bifrost on my local machine, to see if it would actually fix that.
Bifrost is a high-performance, open-source LLM gateway, built in Go. It puts multiple AI providers behind a single OpenAI-compatible API, and it does that with ultra-low latency, automatic failover, load balancing, and enterprise governance features baked in.
If you've used LiteLLM before, it may sound familiar on paper, but the experience is pretty different in practice. LiteLLM is a Python library and proxy you configure and run yourself; Bifrost ships as a standalone Go binary with a full web dashboard baked in, so there's no separate observability stack to stand up just to see what's actually happening to your requests. That dashboard ended up being the thing I used the most, as you'll see below.
I wired it into OpenCode, an open-source coding harness similar to Claude Code and Codex. I'm using an OpenCode Zen key and a Gemini key, and together, these give me access to multiple SOTA models for free, without touching a separate dashboard for each provider.
Installation and Setup
The installation and setup was very simple, and quick.
First, I installed the Bifrost CLI using this command:
npx -y @maximhq/bifrost
Note: This requires Node and NPM to be installed on your machine, otherwise it won't work. If you want to know how to install and manage node versions, you can follow this blog that I've written earlier.
Now, it's time to run Bifrost! I'm doing it in a directory level, but you can also do it in a system level as well, if you want. For that, you can easily follow the Bifrost documentation.
npx -y @maximhq/bifrost -app-dir ./my-bifrost-data
I ran this command in my working directory, and this will create the configuration files and the logs db using sqlite.
And also, this will expose our dashboard in port 8080, and from there we can easily set our API keys and use them in our applications, which I will get to you later in this blog.
Connecting Your Providers
Now it's time to grab your API keys, and connect it to Bifrost.
As I've mentioned previously, I will be using Zen and Gemini. Both of these have generous free tiers, and getting the API keys doesn't require any credit card details.
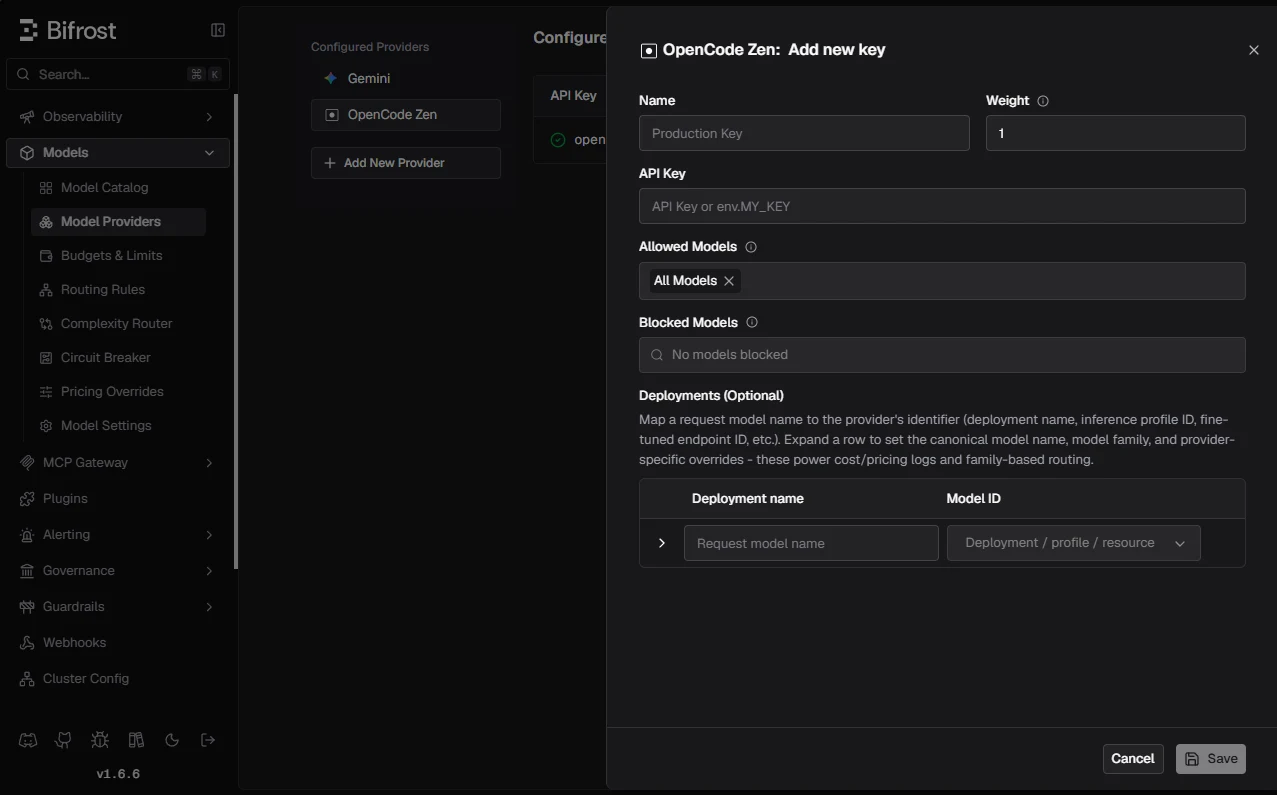 Adding an OpenCode Zen key in Bifrost, with allowed and blocked models configurable per key.
As you can see from the above screenshot, adding your keys is pretty simple. You just need to select your provider, assign a name to your key and you are good to go!
Additionally, you can also add allowed models to your specific key, because most of these keys come with a lot of available models, and if you don't want to use all of them, or limit your pool, you can do it from here as well.
Integrating With OpenCode
Now that you have connected your providers to Bifrost and it is already running, we can now integrate Bifrost and these models directly to OpenCode.
Now, adding a connection like Bifrost means you have to manually edit the config file. Based on your operating system, the location of the config file might vary. More detailed info about that you can check on OpenCode's official documentation.
But the file that we need to edit is opencode.json. In the provider block, we have to add something similar to this:
"bifrost-local": {
      "npm": "@ai-sdk/openai-compatible",
      "name": "Bifrost Local",
      "options": {
        "baseURL": "http://localhost:8080/v1"
      },
      "models": {
        "opencode-zen/big-pickle": {
          "name": "Big Pickle via Bifrost"
        },
        "gemini/gemini-2.5-flash": {
          "name": "Gemini 2.5 Flash via Bifrost"
        }
      }
    }
Note: I gave this its own bifrost-local provider block instead of just pointing OpenCode's built-in openai provider at Bifrost, the way Bifrost's own docs show it, because I wanted it visually obvious in the model selector which models are going through Bifrost versus hitting a provider directly, in case I ever wire up a real OpenAI key in the same config later. Either approach works functionally; this is just how I like to keep them apart.
Now this will vary based on your selected model and provider. It is better if you can check it out from the Bifrost docs itself.
Now that we are connected, we can launch OpenCode from our terminal (or app), and in the model selector we will see something like this:
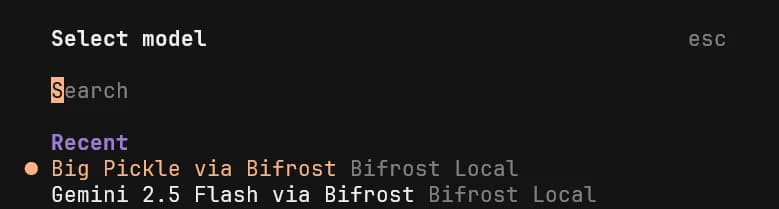 Both models now show up in OpenCode's model selector, routed through Bifrost Local.
Now we can select this model and use it to do our task on OpenCode.
But wait, till now I just described how Bifrost sits between your model provider and harness. So, let's get to the crux and find out what more things we can do with Bifrost!
Monitoring and LLM Logs
Bifrost gives us a clear understanding of how our models are performing, the amount of tokens they are consuming, the latency and the cost as well.
In the screenshot below, you will be able to see how Bifrost does that:
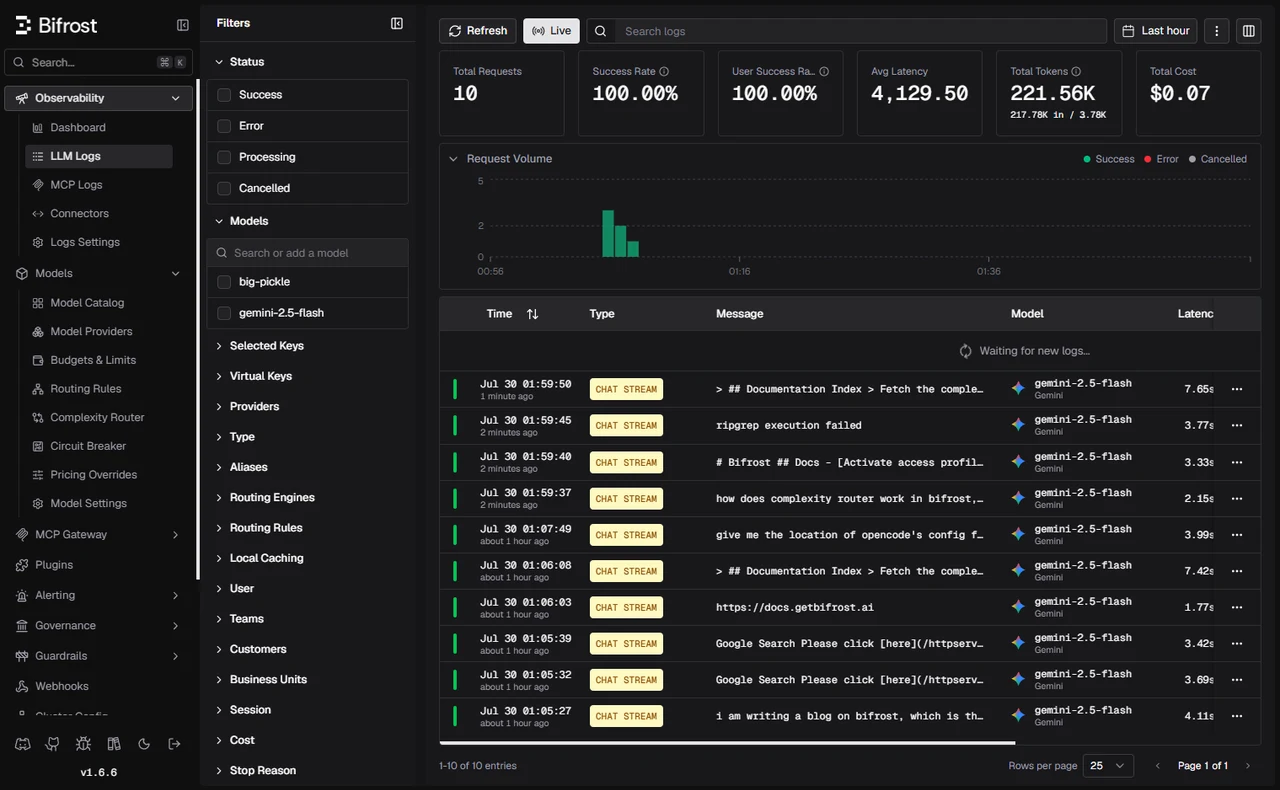 Bifrost's live LLM logs: requests, success rate, latency, tokens, and cost, all in one dashboard.
We can see and check the detailed logs as well.
Everything is stored locally and nothing gets sent to the cloud, other than the messages we're sending to the model providers, which is obvious.
Model Routing
Now the most interesting part: how do we automatically route the models?
During production, one model might fail to respond, and it's kinda common. So for those scenarios, we can set rules like:
If model A is not available, then use model B.
This is the simplest version though. Using CEL expressions, we can create custom routing rules for almost anything that we want.
If models are available and we have a specific logic in mind, we can implement that in Bifrost easily.
So, for now, let's create a simple rule, such that: if Gemini models aren't available, we will route the traffic through Zen models instead.
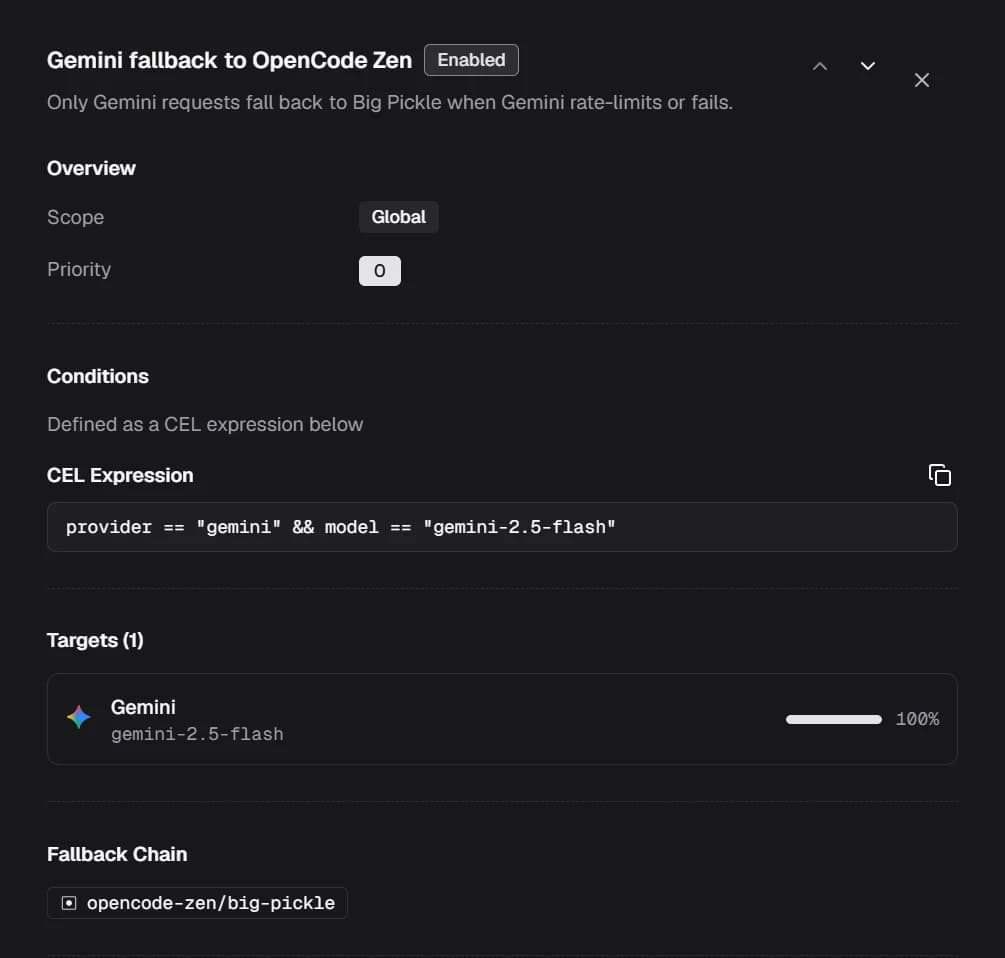 The fallback rule: if Gemini's gemini-2.5-flash fails, route to OpenCode Zen's Big Pickle instead.
As you can see in the screenshot above, I have created a global rule with maximum priority, such that if the provider is gemini and the model is gemini-2.5-flash, and if the user is using that specifically, we will fall back to opencode-zen/big-pickle instead.
Now as the rule is set and applied, I will temporarily disable the gemini services to see what happens.
Let's come to OpenCode, and type a "hi", and let's see what happens.
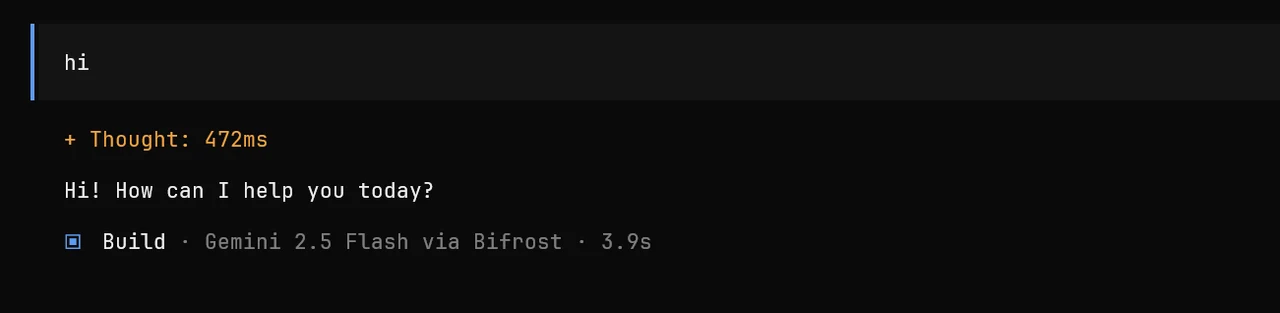 Sent a quick "hi" from OpenCode with Gemini disabled, no visible interruption.
As you can see, the user didn't get any interruption at all. Let's check the logs to find out what actually happened here.
 The logs confirm it: Gemini errored out, and Bifrost silently fell back to big-pickle.
As we can see, the gemini model gave an error, and it automatically fell back to big-pickle, and gave me the response.
That's the magic of Bifrost.
The Complexity Router
Now that we have understood Model Routing, let's see how we can determine and set what kind of requests should go to which kind of models.
For example, we can route trivial queries to cheap models, while preserving the expensive ones for difficult tasks.
The idea is simple: divide the incoming requests into four tiers: simple, medium, complex and reasoning.
So I've configured my complexity routing profile, and you can easily do it as well based on your own requirement. Here's my profile:
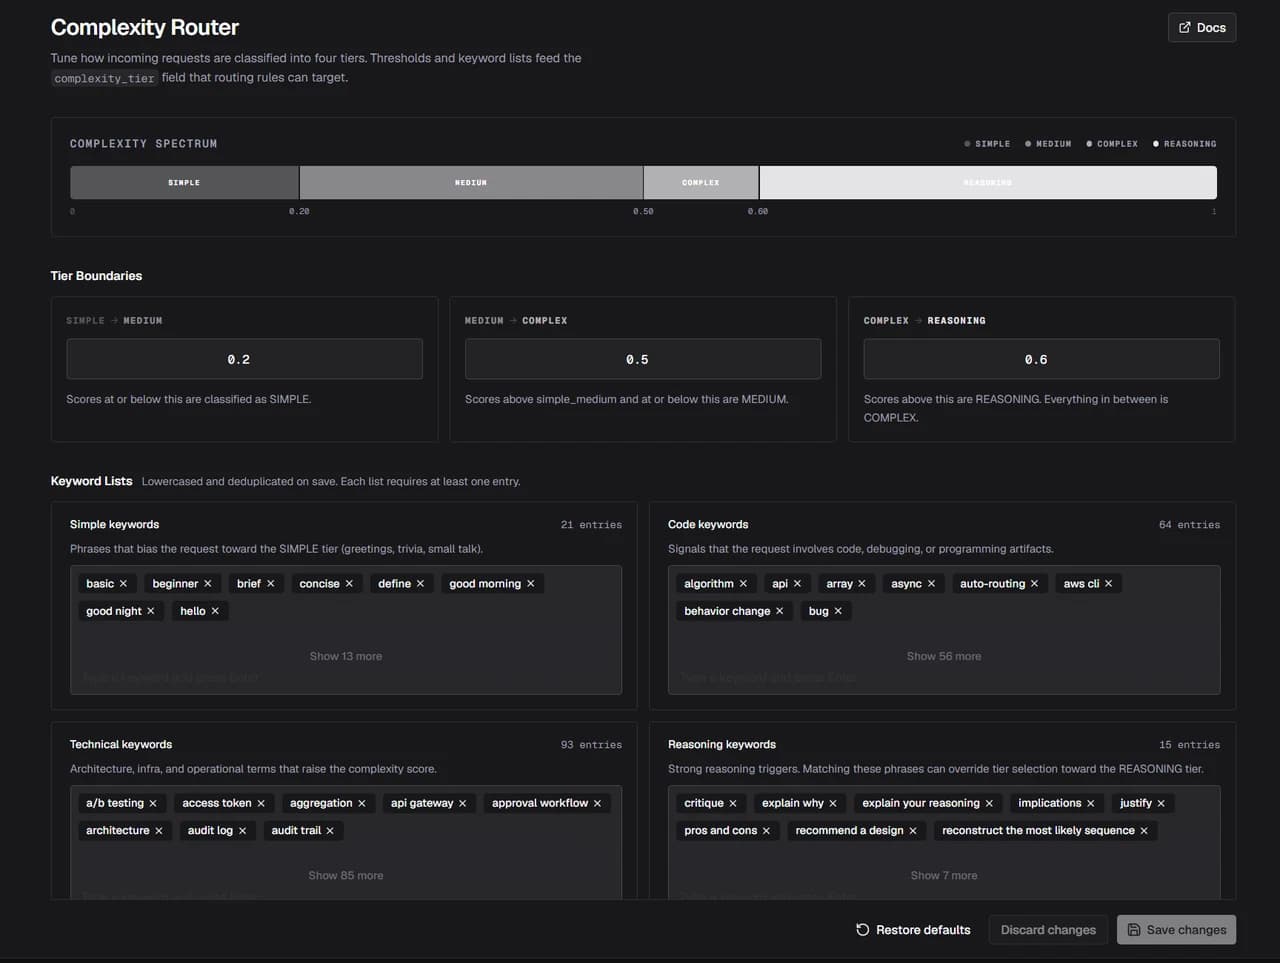 My complexity routing profile: tier boundaries and keyword lists that decide simple, medium, complex, and reasoning requests.
For my simple and medium queries, I want the gemini model to handle that, and for complex and reasoning-based queries, I want them to go to big-pickle.
Now, we need to create custom routing rules for that.
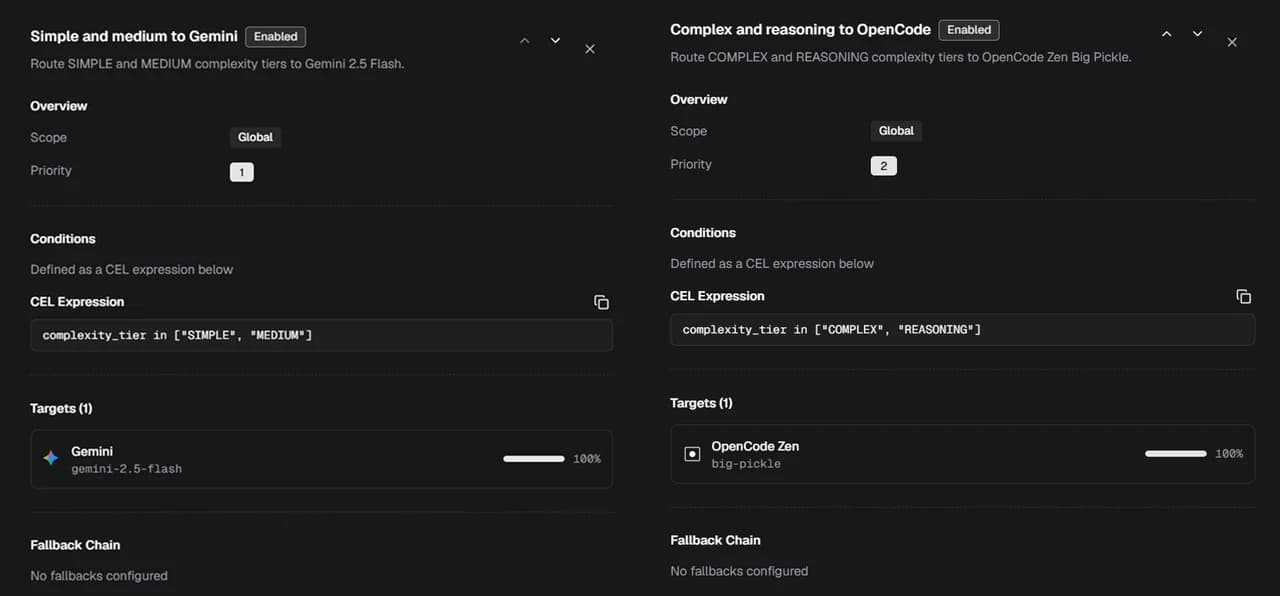 The two complexity routing rules: simple and medium traffic to Gemini, complex and reasoning traffic to Big Pickle.
Now that the rules have been created, let's test them, and check the LLM logs. I'll send two queries from OpenCode:
Hello, briefly define REST API.(expected to go to gemini)How to debug an async API authentication failure step by step, explain the root cause, and recommend an architecture fix.(expected to go to big-pickle)
 The simple query went to Gemini, the complex one to big-pickle, exactly as configured.
And we can see in the screenshot above that it worked exactly how we intended.
Bifrost Can Do a Lot More
Model routing and the complexity router are the two features that got me the most excited, but Bifrost isn't limited to just these two. It also ships guardrails, virtual keys, and cluster mode for scaling across machines, and that's still on my list to explore.
Honestly, I loved this. Setting it up took maybe fifteen minutes end to end, and it quietly fixed a problem I'd been living with for a while: juggling separate API keys and dashboards for every provider I wanted to test. The fallback and complexity routing worked exactly the way the docs said they would, no surprises, and that alone made this whole exercise worth it.
If you're juggling more than one model provider and keep swapping keys by hand, give Bifrost a shot. And if you've already tried it, let me know what you built with it, or find me on X.